AWS
RANCHER
EKS
CLUSTER
KUBERNETES
How to install Rancher inside AWS EKS
Learn how to install Rancher inside AWS EKS while getting important concepts about Kubernetes.
Guilherme Mota
21 mar 2021 - 13 min readRancher is an abstraction made on top of Kubernetes in order to help dealing with a lot of clusters in different services and regions with an useful dashboard.
By using it, you are able to deploy .yml files, deployments, custom apps, default apps, ssl certificates and so on in an easier way (and even other clusters on another services like AWS, Google Cloud, etc).
The "Rancher" name comes from a common joke of Devops: "Cattle vs Pets". Usually the Devops people want to treat their apps as cattle instead of pets, since when you have a pet, you need to take care of it and with a cattle you just need to replace it when needed (no emotional stuffs here).
One of the ways of installing Rancher is by creating a node master and installing on it, but we consider it to be bad since if you lose the master, you lose all the cluster.
Being minded about that, there is a better way to that, that is by installing Rancher inside the own cluster, it means that Rancher node master will be available inside every VM of the cluster. So today, we will learn about how to install it inside a running AWS EKS cluster.
Creating the IAM Roles
Since our cluster and its resources need permission to do some actions inside AWS, we must create some roles on AWS IAM in order to be able to handle it.
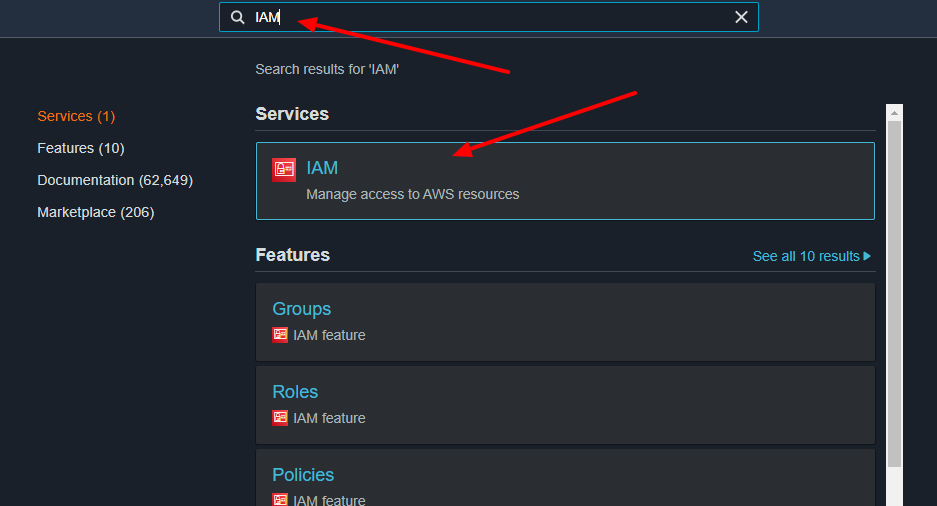
At first, we need to go to AWS IAM by selecting that service inside AWS (you can use the search input on top of console page).
After selecting the service above, we need to go into the roles item of the left side menu and so, you will need to click on the Create Role button.
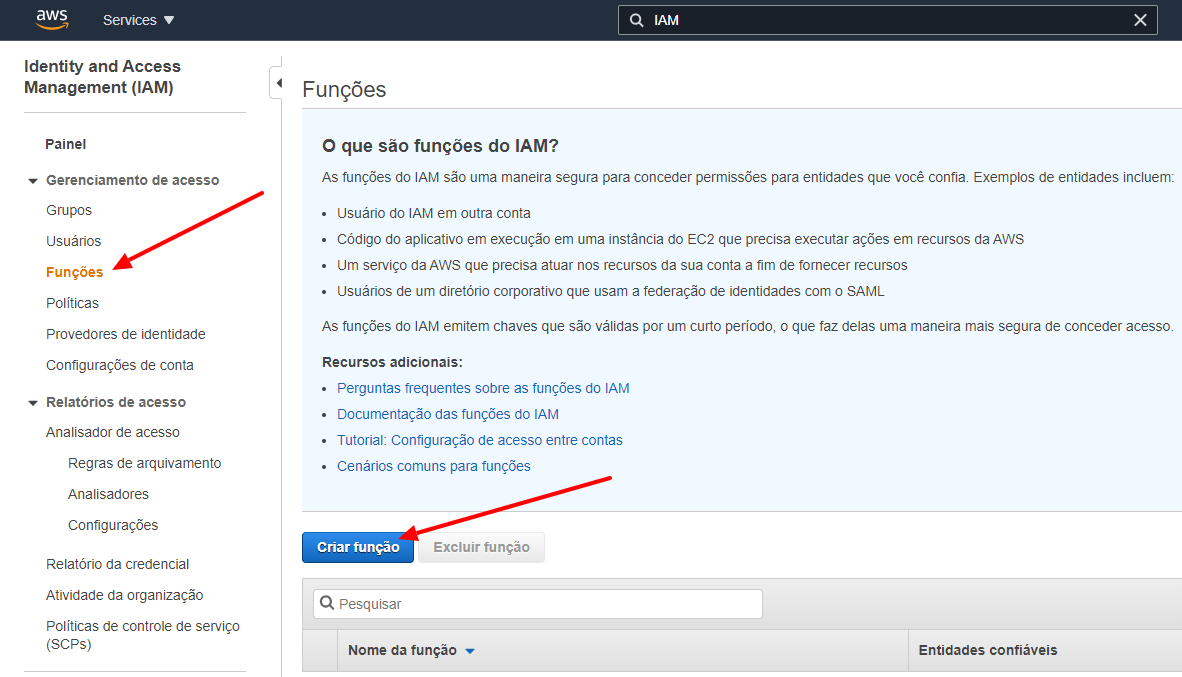
Now that we are on the creation page, will need to create two roles in order to help our cluster working later.
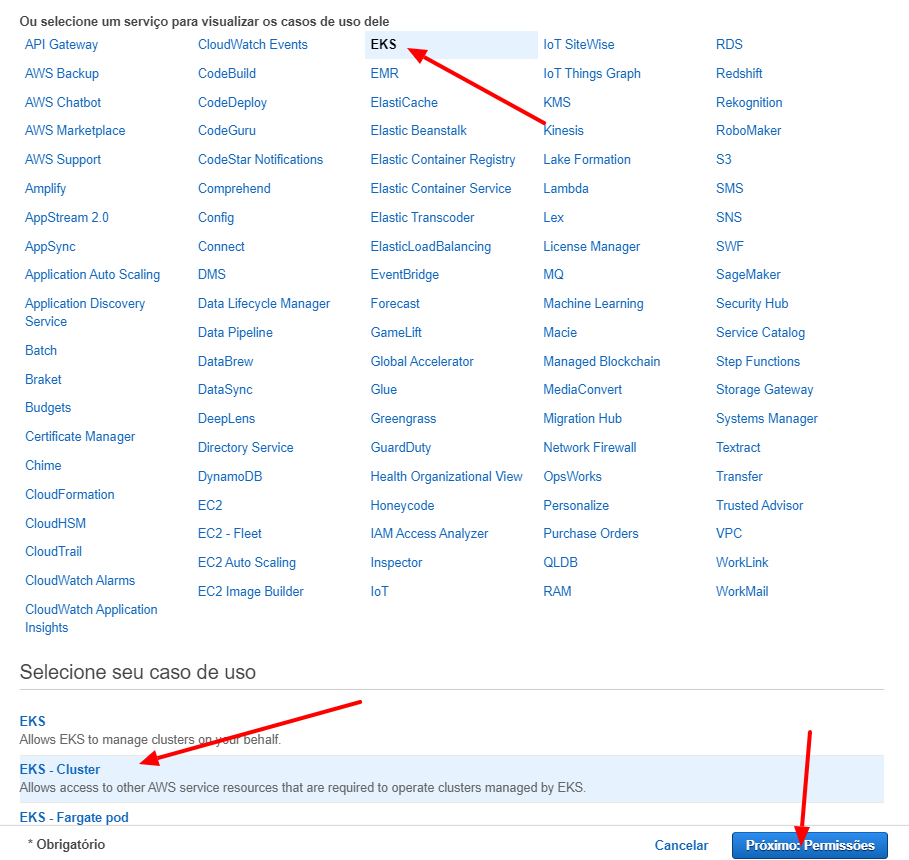
Creating the Cluster Service Role
At first we need to create a role to give some permissions to the cluster itself, so we need to select EKS from the list that will be shown and, select EKS Cluster on the sub-item list in the bottom of the page and so, click on Next button.
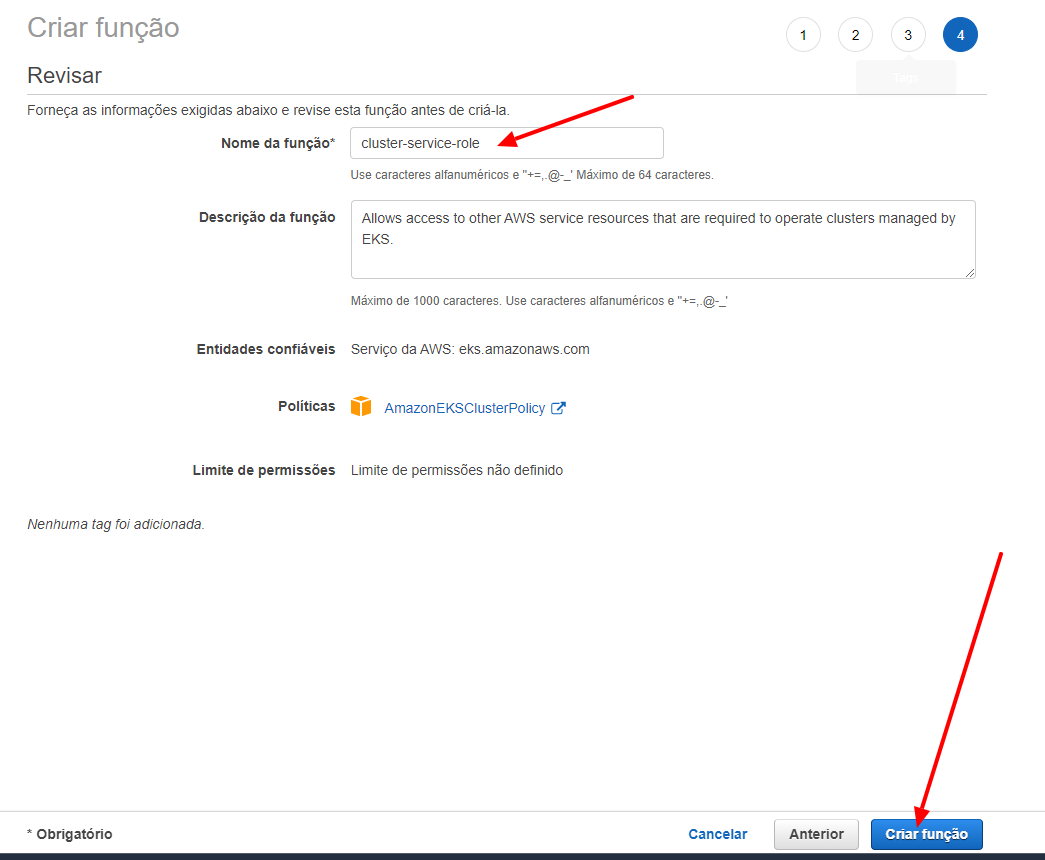
We will name this role as cluster-service-role and click on the Create Role button.
Creating the Node Group Role
Click on the Create Role button on the Role Page again in order to create a new role for the node groups. Now we need to select EC2 on the top list and EC2 on the bottom list.
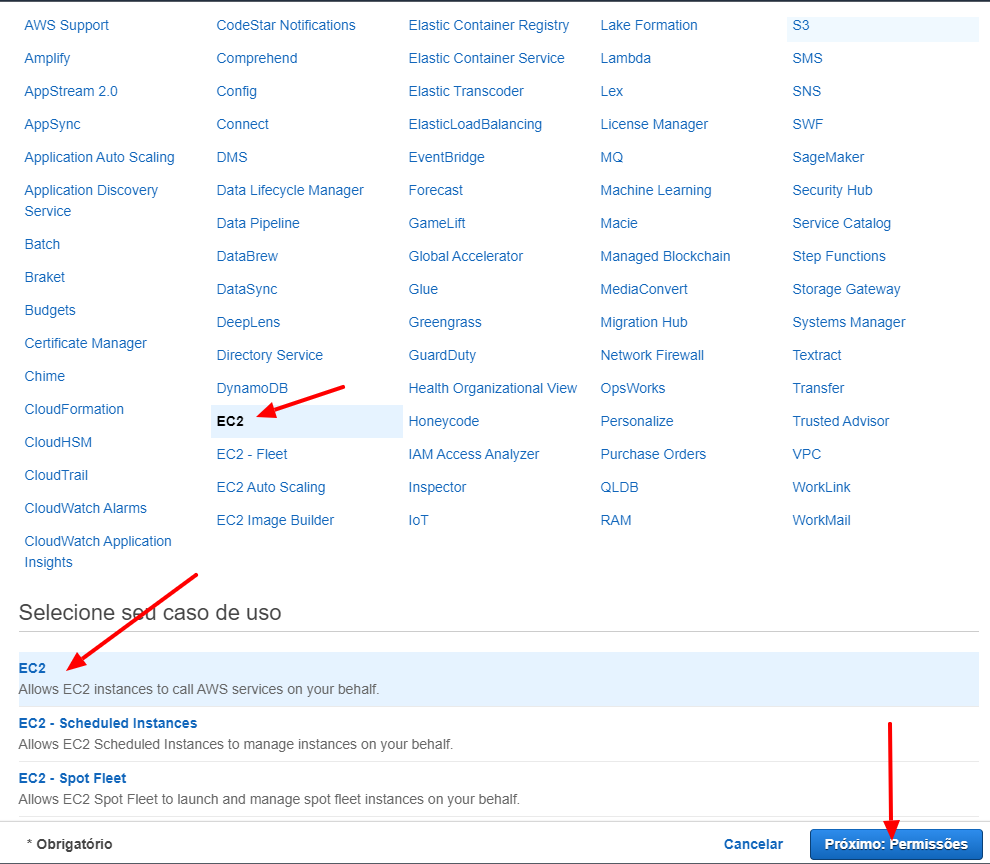
For this role, we need to select manually the following polices: AmazonEKSWorkerNodePolicy, AmazonEC2ContainerRegistryReadOnly, AmazonEKS_CNI_Policy. After selecting these policies, we will name that role as node-group-role and click on the Create Role button.

Creating an EC2 Key Pair
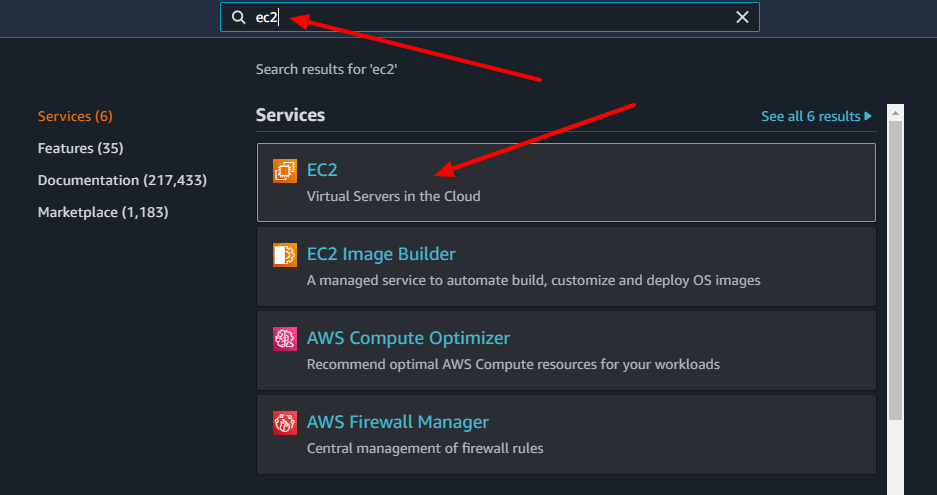
In order to get access for the cluster nodes by EKS, it is needed to create a key pair to make that authentication when needed. In order to do that, go to the EC2 page by searching it on the console.
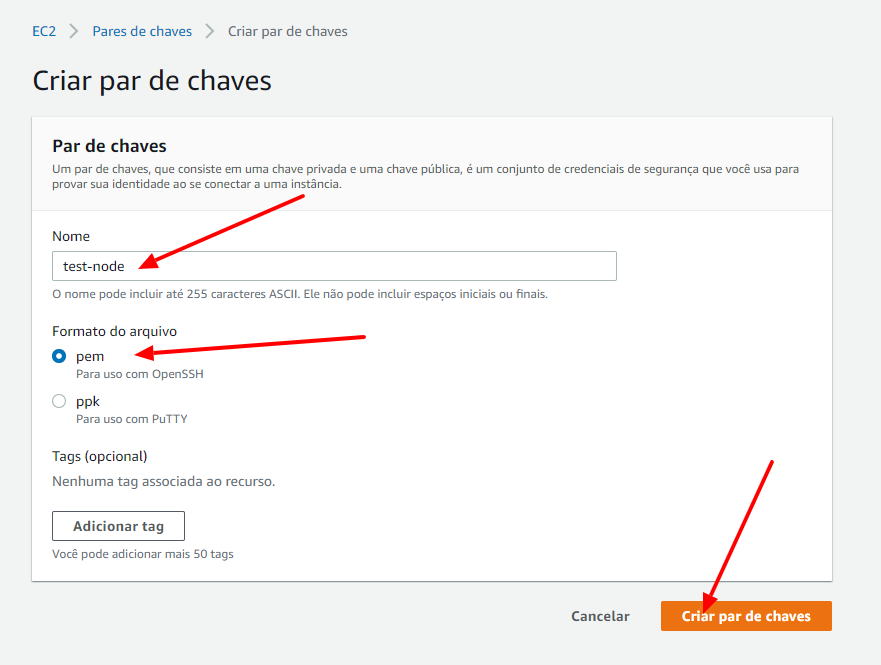
Go to the Key Pair page by selecting it on the left side menu and click on the Create Key Pair button.

Name it the way you prefer (in my case I chose test-node), select pem format and click on the Create Key Pair button.
Creating the Cluster
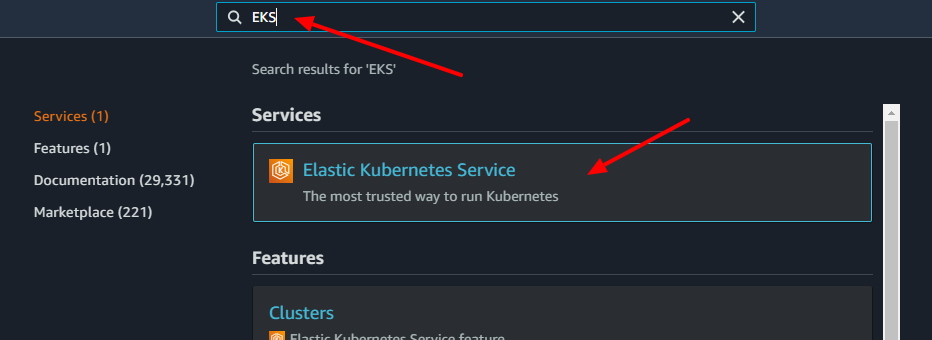
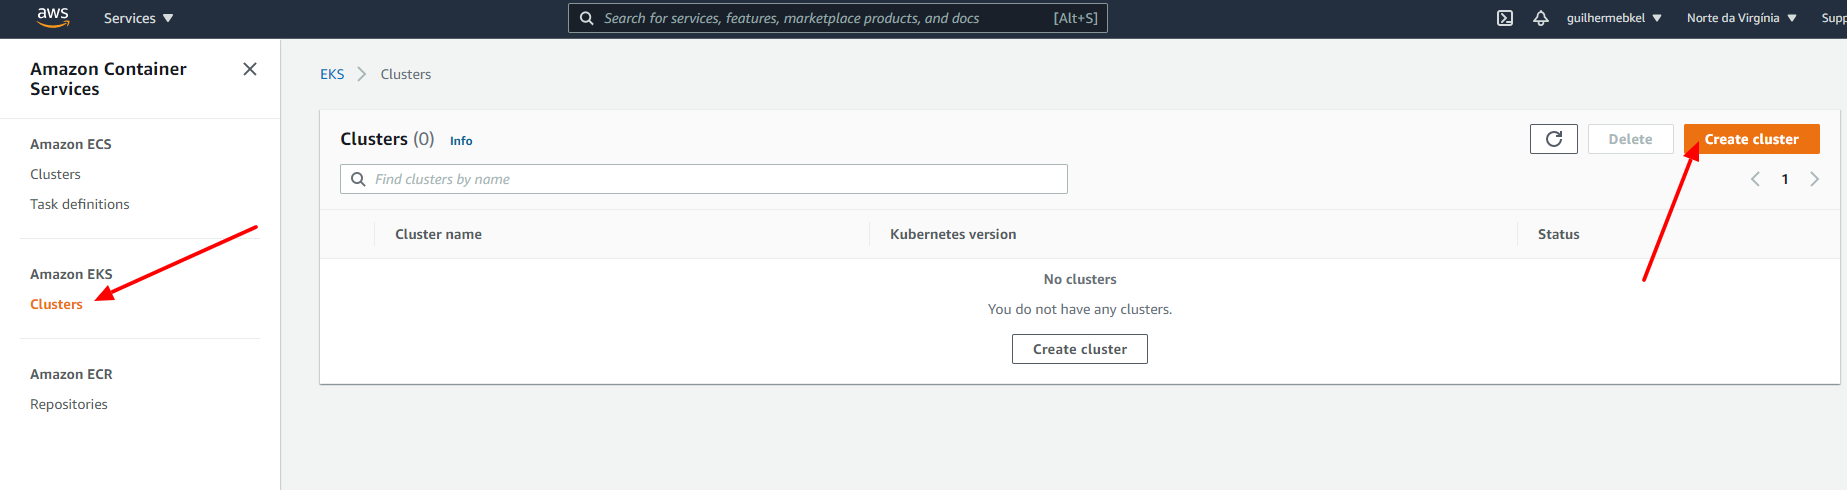
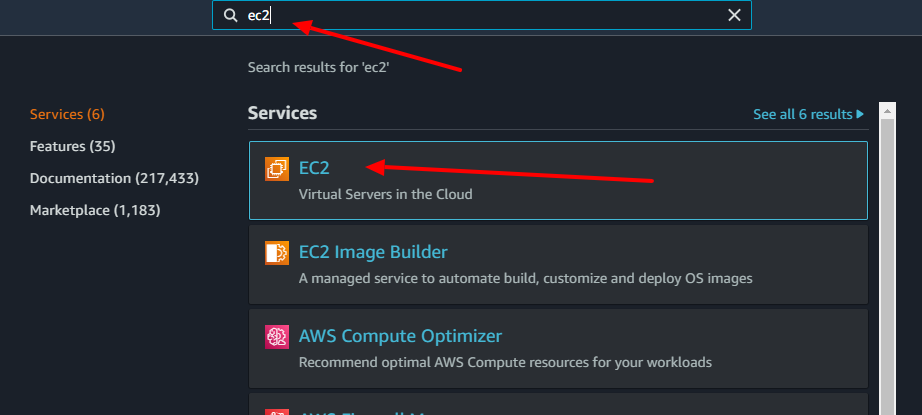
Go to the EKS page by searching it on the console.
Go to the EKS Clusters page by selecting it on the left site menu and click on the Create Cluster button.
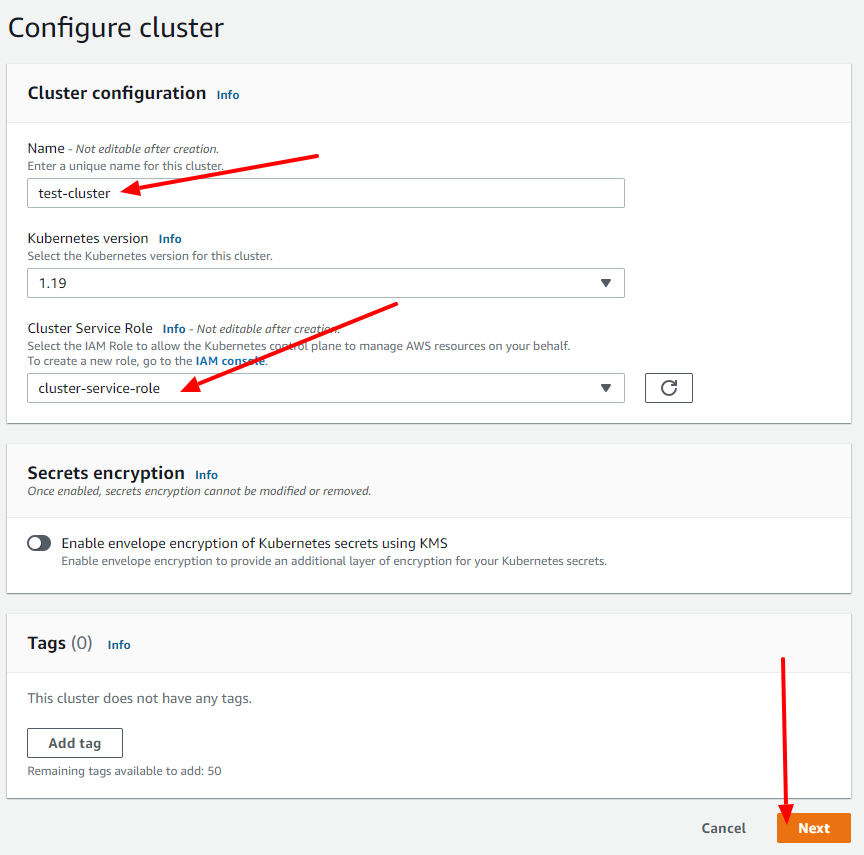
At first, choose the name you prefer for the cluster (in my case I used test-cluster), add the Cluster Service Role you created before and click on the Next button.
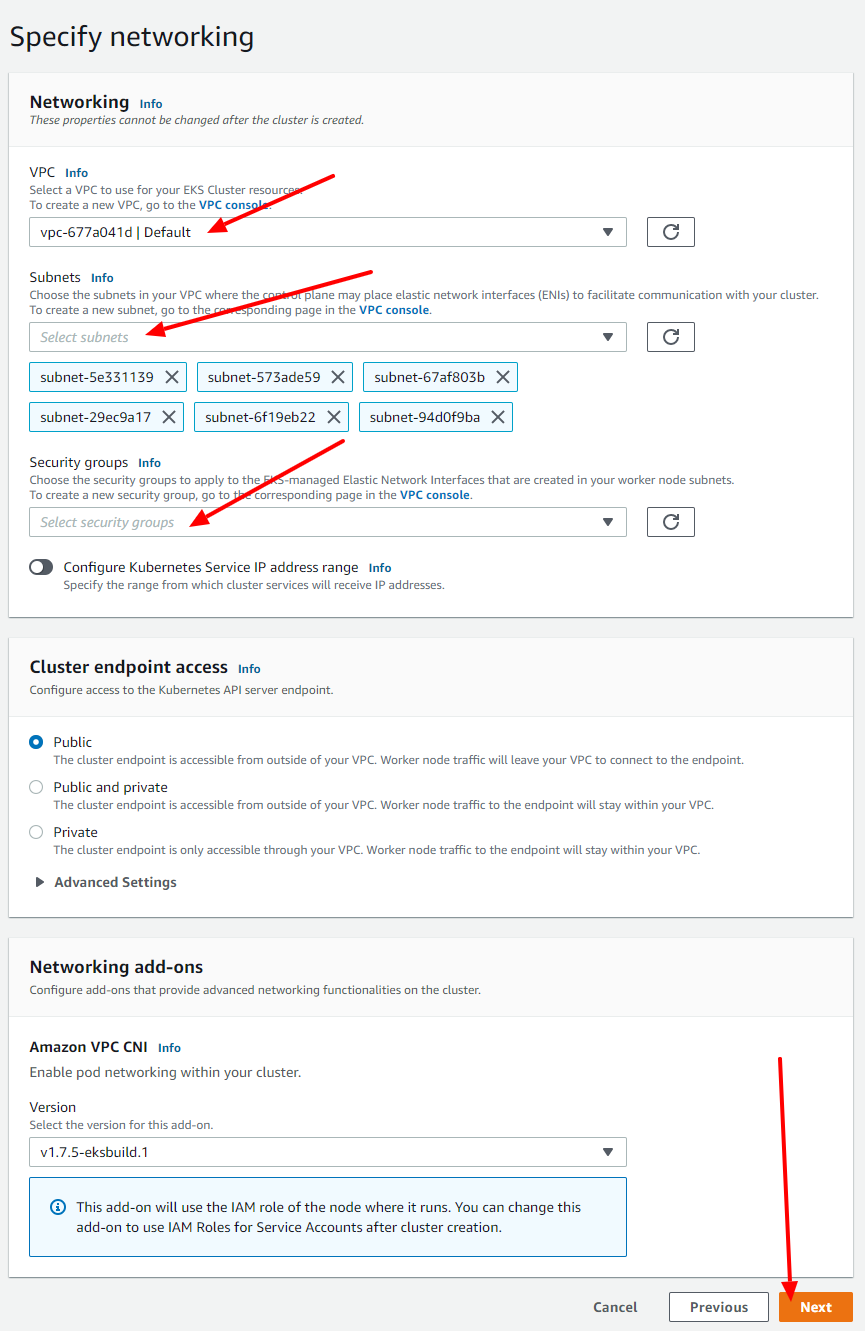
Now, select the networking config for your cluster, usually on that part you just need to click on the Next button since EKS already selects the default configs for you (but you can change it in case you need).
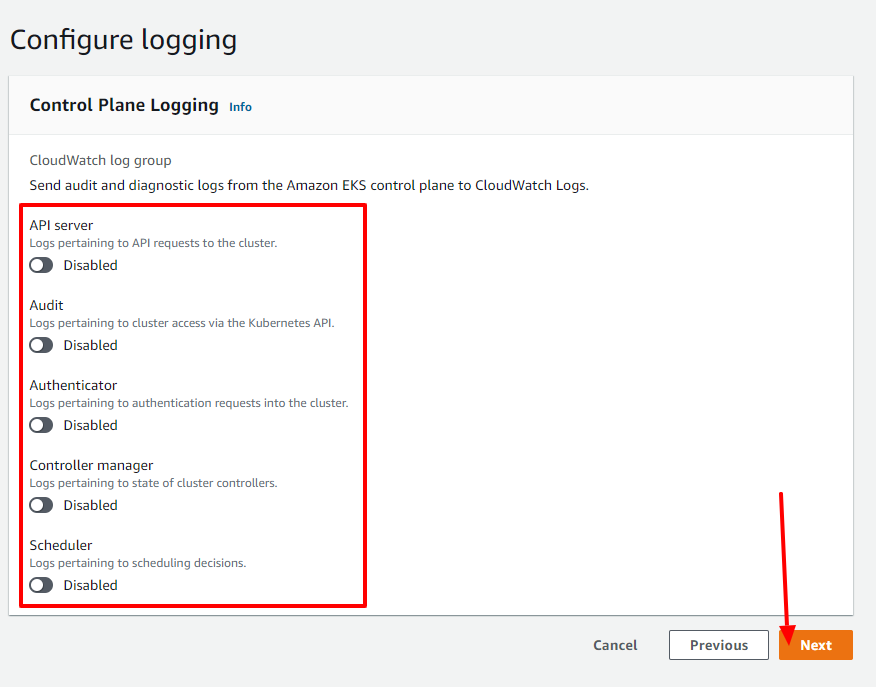
Now you are able to select some logging configs to your cluster with CloudWatch (you can config it the way you prefer, usually I keep it off).
After making all the creation steps, you will get into a final step that you can use to review all the configs you added, so now you just have to click on the Create button in order to finish creating your cluster.
The cluster will be available after some minutes, so take the opportunity to make some coffee in order to get into the next steps.
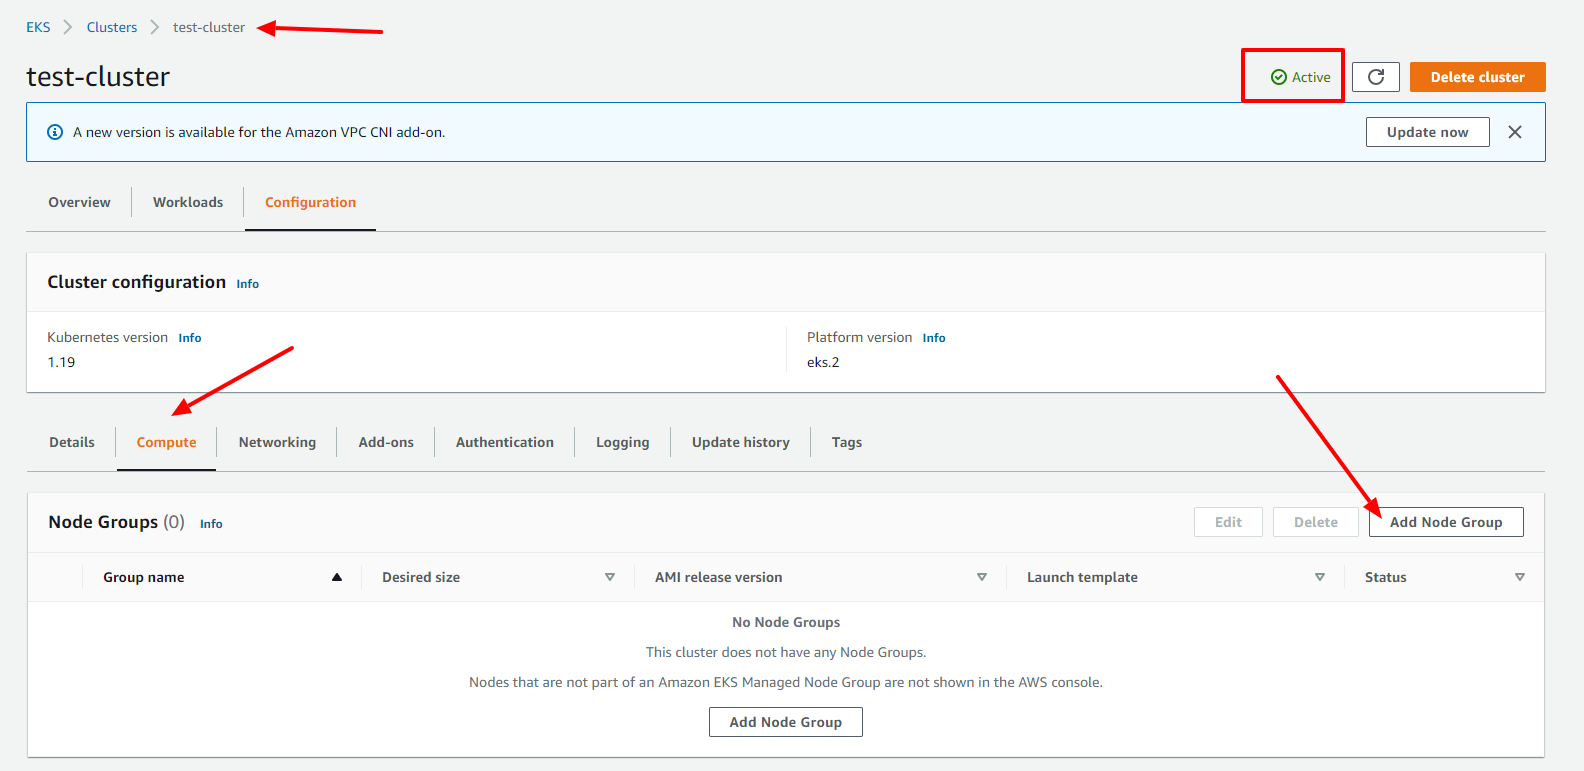
Creating the Node Group
After the cluster is deployed successfully, we need now to create a node group that is basically a group of EC2 instances that we can scale the way we prefer to run our cluster inside.
In order to create a node group, click on the Add Node Group button.
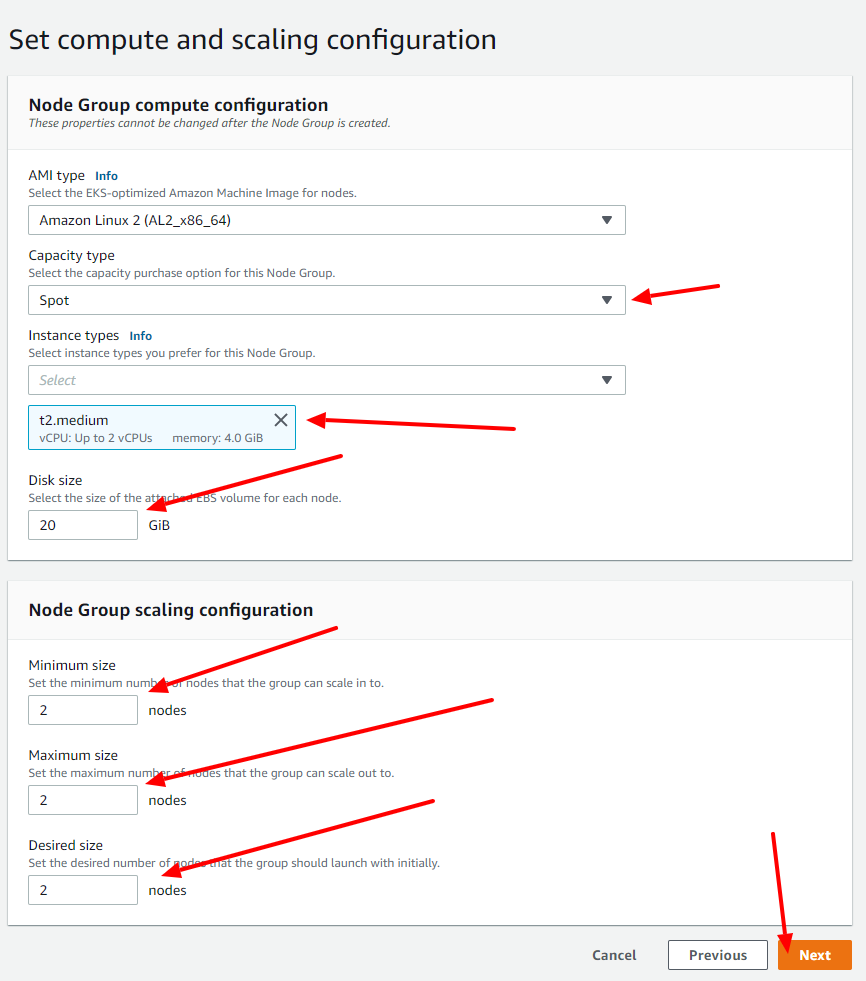
Name the node-group the way to prefer (I chose test-node-group on mine), select the Node Group Role you have created before and click on the Next button.

Now it is time to select the resources of our node group. In order to run Rancher inside the cluster, we need at least 2 instances of type t2.medium, so that is the config you will see on the screenshots (but you can change it later and scale the way you want too).
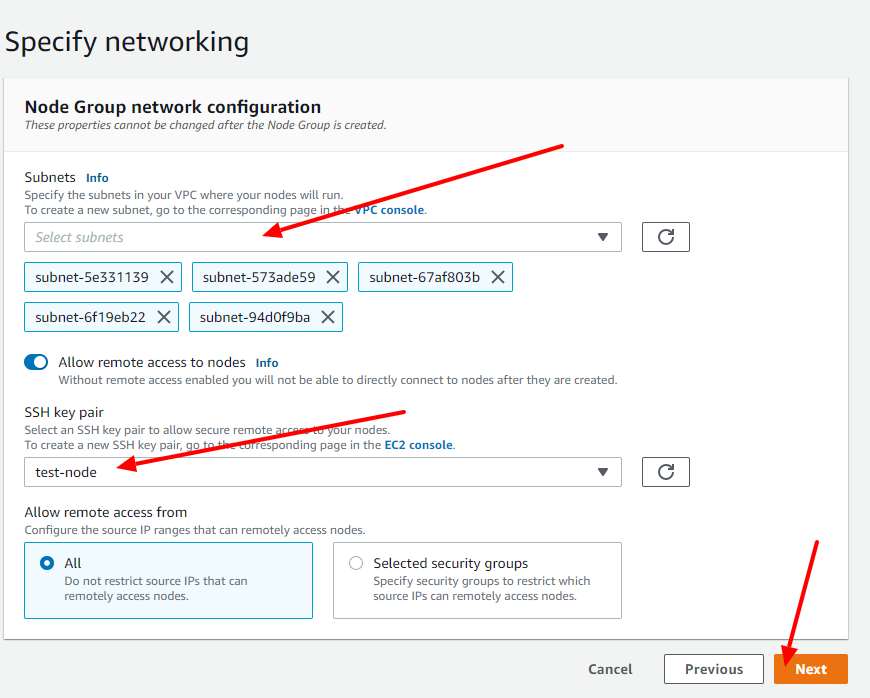
Now it is time to choose the networking config of the node-group (usually the EKS let the default config that most of the time will be all you need, but keep in mind that you can change if you want to). Select the key pair you created before and click on the Next button.
Now we will get into the last step which you can use to review all the configs you set and so, you just need to click on the Create button in order to finish creating the node group.
The node group takes some minutes in order to get up since you will be creating EC2 instances, but we can get into the next steps anyway.
Configuring AWS CLI
In order to make the cluster accessible via terminal to finish all the needed configs, we will need to use the AWS CLI in order to do that. So, you can run the commands below in order to install it.
curl "https://awscli.amazonaws.com/awscli-exe-linux-x86_64.zip" -o "awscliv2.zip"
unzip awscliv2.zip
sudo ./aws/install
Creating credentials to access root AWS user
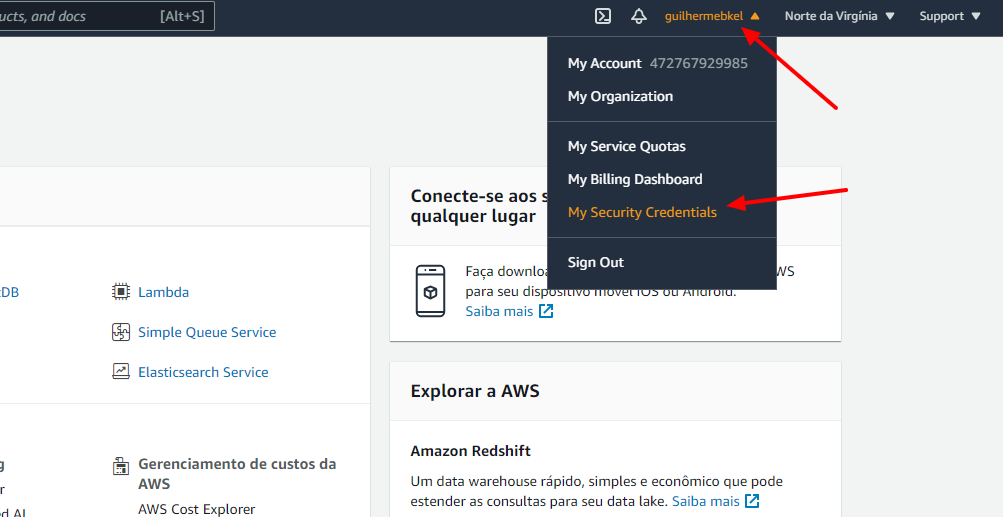
After installing the AWS CLI on your computer, you need to authenticate in order to get access to AWS resources. Being minded about that, we will generate the root user credentials.
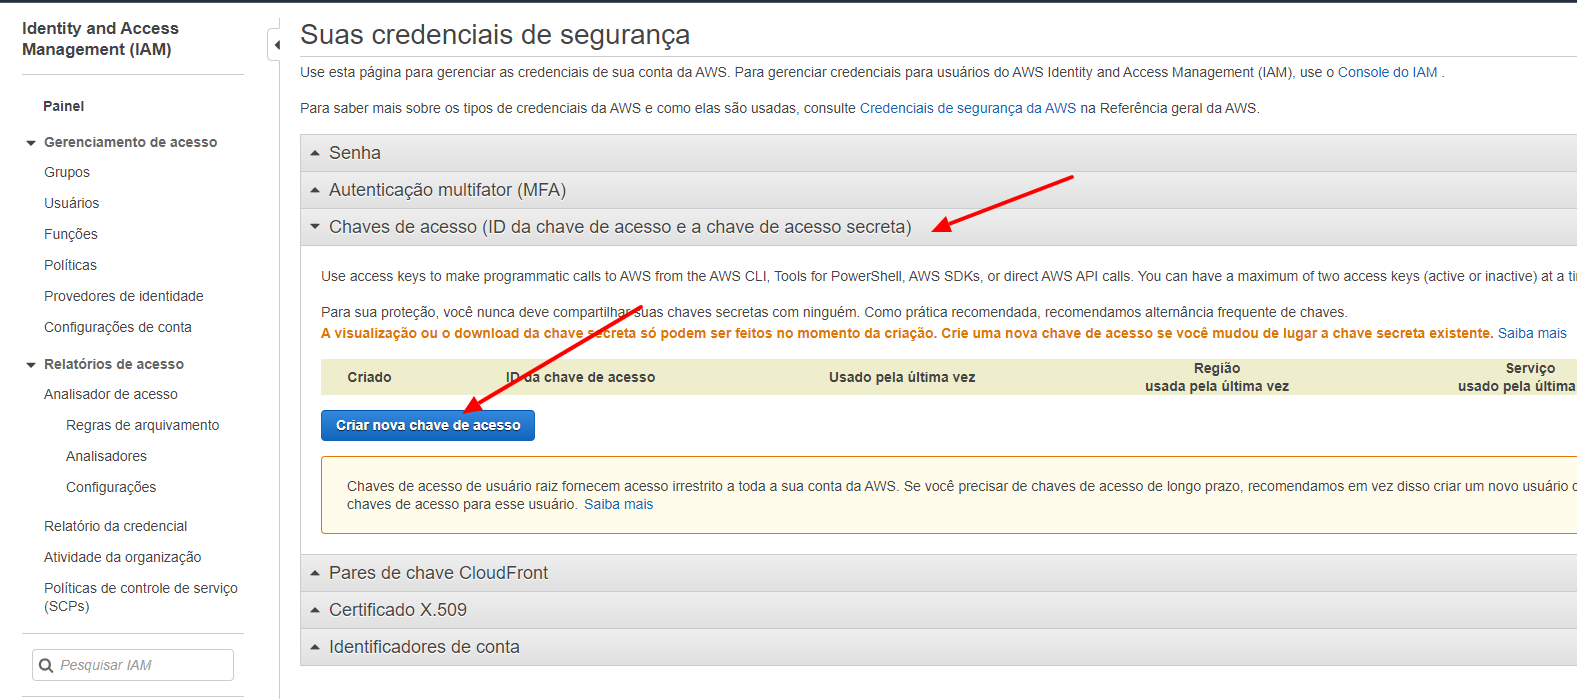
At first, you need to click on your name on the right side top and to click on My Security Credentials link.
After openning the link, you just have to click on the Access Keys option on the middle of the page and so, to click on the Create a new access key button.
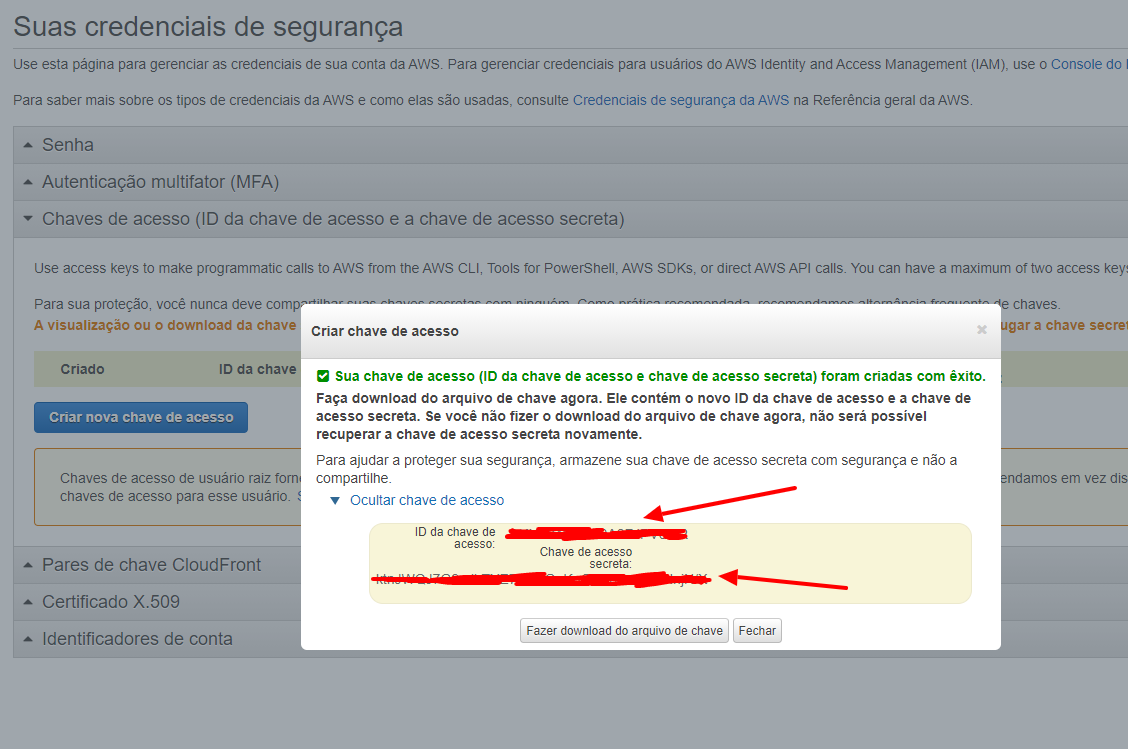
After doing that, you will now have access to your Access Key and Secret Key.
Now that you have your credentials in hand, you need to run the command below and paste the credentials when asked.
aws configureLinking AWS EKS CLI with Kubectl
In order to run kubectl commands inside the aws cluster we have created above, we need to make a simple config.
At first, in case you do not have kubectl installed, you can install it with the following commands.
curl -o kubectl https://amazon-eks.s3.us-west-2.amazonaws.com/1.19.6/2021-01-05/bin/linux/amd64/kubectl
chmod +x ./kubectl
mkdir -p $HOME/bin && cp ./kubectl $HOME/bin/kubectl && export PATH=$PATH:$HOME/bin
After installing kubectl, you need to install the AWS EKS CLI. It can be done by doing the following commands.
curl --silent --location "https://github.com/weaveworks/eksctl/releases/latest/download/eksctl_$(uname -s)_amd64.tar.gz" | tar xz -C /tmp
sudo mv /tmp/eksctl /usr/local/bin
Now, in order to link AWS EKS CLI with Kubectl, you just need to run the command below (remember to use the region used to create the cluster and the name you have put on your cluster).
aws eks --region us-east-1 update-kubeconfig --name test-clusterInstalling Rancher inside AWS EKS
Now it is time to starting the rancher setup. The first step and most important to get it to work is to install an Ingress Controller to handle all the cluster requests into a one single place.
Setting up the main Ingress Controller
You can install the correct Ingress Controller with the following command (keep in mind that if you install the wrong ingress controller, the Rancher installation can be missed up, so, usually we use the open source version of nginx).
kubectl apply -f https://raw.githubusercontent.com/kubernetes/ingress-nginx/controller-v0.44.0/deploy/static/provider/aws/deploy.yamlAfter installing the Ingress Controller, a Load Balancer will be automatically created on AWS and you will have to point the CNAME you prefer to its DNS (it will be the entry point of Rancher console).
In order to get the DNS, you need to go to the EC2 page by selecting it on the search field of the console.
Now click on the Load Balancer on the left side menu, select the Load Balancer on the list and so, look at the DNS field of the Load Balancer Information.
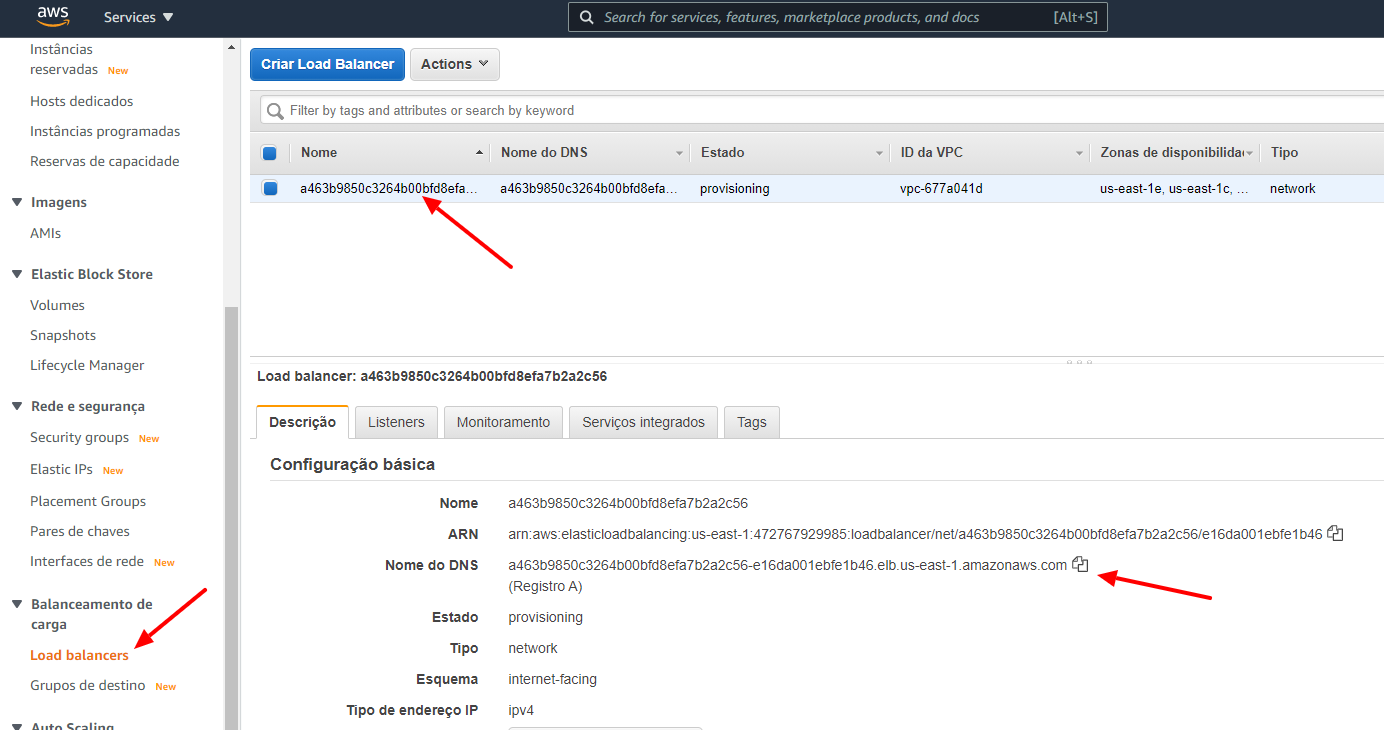
Now you just need to point your domain to the DNS in order to access Rancher Control Panel later. In my case I used the following config:
CNAME rancher.guilherr.me -> Load Balancer DNS
Installing Rancher
Now we need to install helm in order to proceed to the other steps (in case you already have it installed you do not need to do it again). You can do it with the following commands:
curl -fsSL -o get_helm.sh https://raw.githubusercontent.com/helm/helm/master/scripts/get-helm-3
chmod 700 get_helm.sh
./get_helm.sh
Now you need to install the Rancher charts with the following command:
helm repo add rancher-latest https://releases.rancher.com/server-charts/latestNow you need to create a namespace for Rancher using the following command:
kubectl create namespace cattle-systemNow we need to install cert-manager in order to help setting up the automatic SSL Certificate creation of our cluster resources.
kubectl apply --validate=false -f https://github.com/jetstack/cert-manager/releases/download/v1.0.4/cert-manager.crds.yaml
kubectl create namespace cert-manager
helm repo add jetstack https://charts.jetstack.io
helm repo update
helm install \
  cert-manager jetstack/cert-manager \
  --namespace cert-manager \
  --version v1.0.4
In the end, we just need to run the following command in order to install the Rancher on our cluster and get it working (remember to use the domain you have pointed on the ingress on the hostname option and to change the email field that will be used to generate SSL Certificates with help of Let's Encrypt later).
helm install rancher rancher-latest/rancher \
  --namespace cattle-system \
  --set hostname=rancher.guilherr.me \
  --set ingress.tls.source=letsEncrypt \
  --set letsEncrypt.email=rancher.certificates@guilherr.me
Now you need to wait some minutes until the Rancher finishes installing on the cluster. After the installation is complete, you just need to go to the domain you pointed at the Ingress Controller (in my case it was rancher.guilherr.me) and a beautiful page will open as follows:
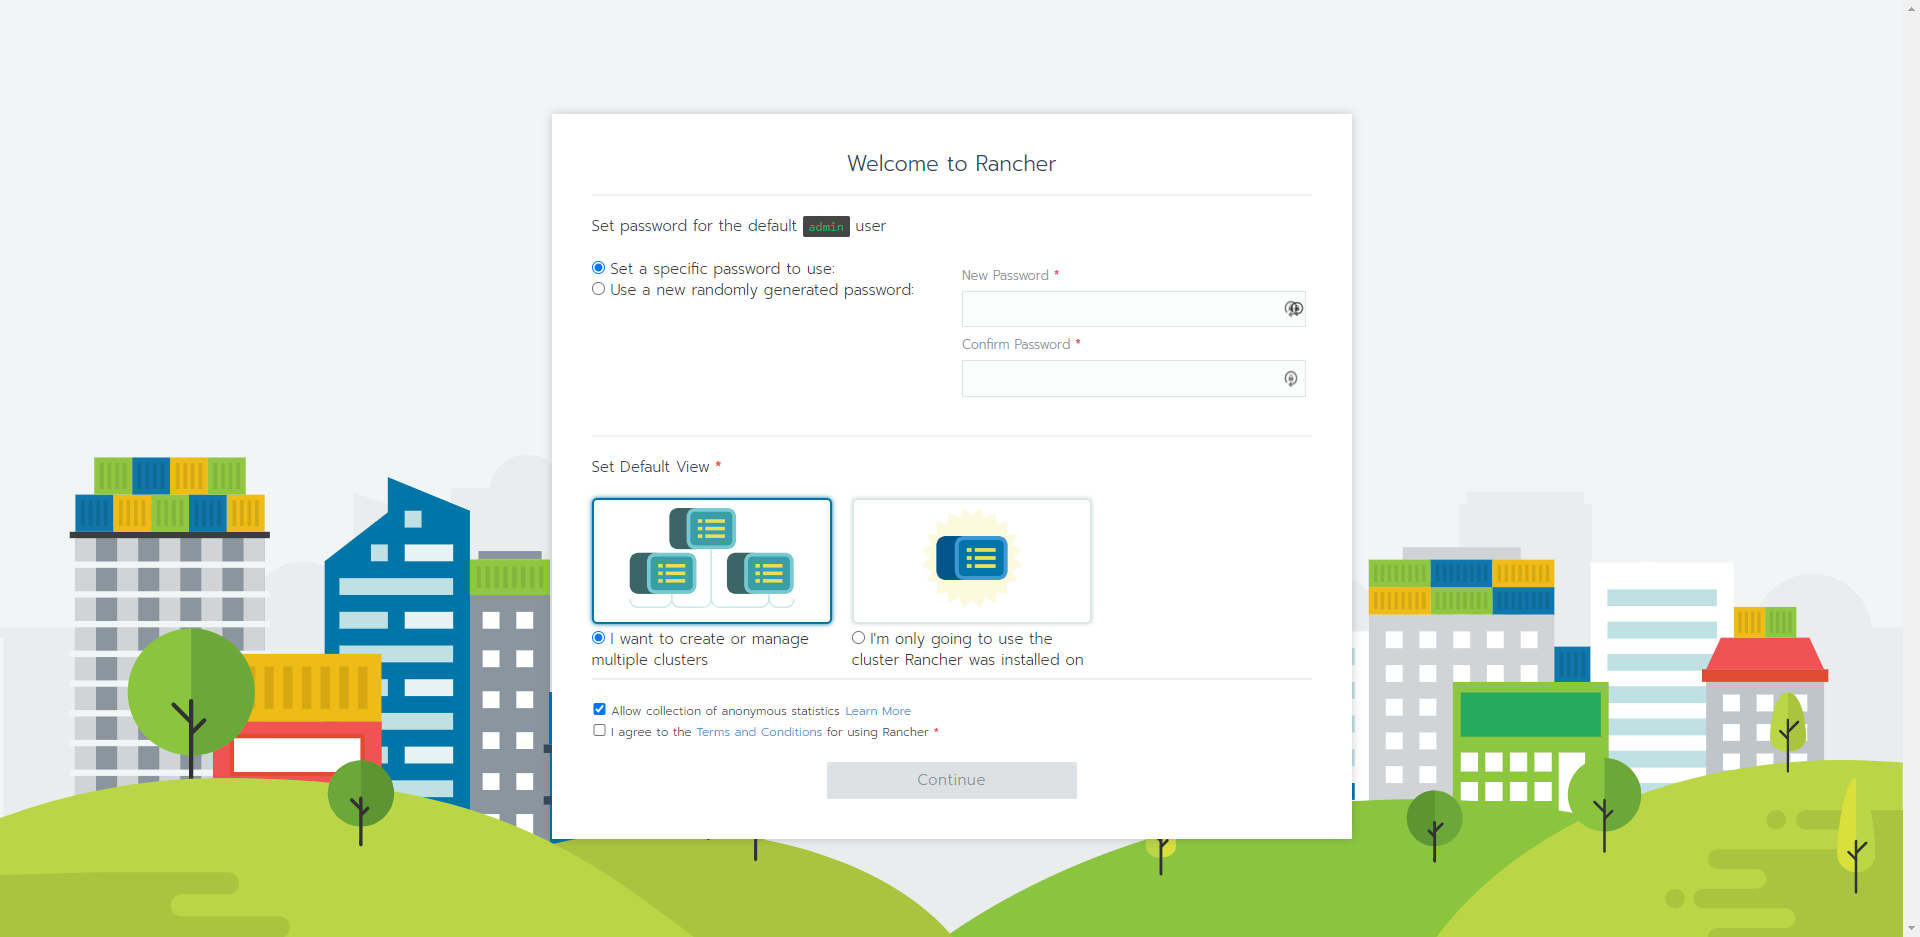
Congratulations! Now you have Rancher installed inside your AWS EKS! You need to select the configs you prefer on the page above and I suggest you to start testing stuffs on the Rancher Dashboard (there is a lot of good sttufs to do).
Bibliographic References
- Installing AWS CLI: https://docs.aws.amazon.com/pt_br/cli/latest/userguide/install-cliv2-linux.html
- Creating root credentials for AWS user: https://docs.aws.amazon.com/pt_br/cli/latest/userguide/install-cliv2-linux.html
- Configuring credentials on AWS CLI: https://docs.aws.amazon.com/cli/latest/reference/configure/index.html
- Installing kubectl: https://docs.aws.amazon.com/eks/latest/userguide/install-kubectl.html
- Installing AWS EKS CLI: https://docs.aws.amazon.com/eks/latest/userguide/eksctl.html
- Linking AWS EKS CLI with Kubectl: https://aws.amazon.com/pt/premiumsupport/knowledge-center/eks-cluster-connection/
- Installing the correct Ingress Controller: https://kubernetes.github.io/ingress-nginx/deploy/#network-load-balancer-nlb
- Installing Helm: https://helm.sh/docs/intro/install/#from-script
- Installing Rancher: https://rancher.com/docs/rancher/v2.x/en/installation/install-rancher-on-k8s